YouTube TV using the Raspberry Pi on Raspberry Pi OS with HDMI-CEC
Note: If you’re here just for the installation part, click the link to skip to the ” YouTube on Raspberry Pi OS ” section
Find all source files here
I’ve been using the raspberry pi for about 4 years and never have I written a single post on it. Mostly because I’m only trying out things that I find on the internet.
So this post is about turning your Rpi into a dedicated media centre or YouTube TV. (I know that there are tons of guides out there on the internet, but I’ve tried most of them and it just doesn’t work without issues )
My Hardware : Raspberry Pi 3B
Pinout : https://pinout.xyz/#
Why?
I have a SONY Bravia TV that is internet enabled and I have been watching YouTube on it for more than 5 years now. SONY kept pushing updates and updating the YouTube app to ensure compatibility whenever Google decided to make changes. If at all the app stopped working, factory resetting the device helped to fetch the latest updates. But recently, I’ve begun to see more occurrences of page not found errors. Also when it starts playing I can’t access the settings to set the required video resolution.
I see all these as signs of discontinuing support for old YouTube clients. So I decided to put the Rpi to good use - to play YouTube videos and live streams.
💿Top OS choices for media applications
- OSMC
- LibreELEC
After reading a lot of forum posts, I decided to go with installing OSMC - it apparently had more features and was more customizable than LibreELEC. It took a while to set everything up and update my library. This was how it looked then:
https://i.imgur.com/GHRwuy2.jpg?1.jpg
Then I followed an online guide and installed the YouTube addon. I logged into my Google console and got all the API keys and fully signed in and also completed the 2 step device registration. Videos played fine then. Next time I decided to reboot and then when I opened the addon it was asking me to signin again, but the other options like ‘My Recommendations’ and locations based videos were all visible. Videos only played for 2 seconds and kept on buffering. Tweaking the cache settings didn’t help. It took me two days to go through all the kodi osmc forums and try out different solutions. Nothing worked in my case. So I decided to scrap OSMC. I had no intentions of switching to LibreELEC as it too was only a lighter version of kodi.
I’ve always used Raspberry Pi OS and the UI was too old school for a media centre. Additionally, I’d read about Ubuntu Mate playing YouTube better than Raspberry Pi OS and without heating up in some forums. In just a day, I was convinced that Ubuntu Mate was sluggish and had too many unnecessary applications preinstalled. I’m not sure if the substandard performance was because the latest Firefox didn’t run well on Ubuntu, anyways having more than 5 tabs open literally made the RPi crawl.
YouTube on Raspberry Pi OS
The next obvious choice was using the latest Raspberry Pi OS Buster with just the barebones desktop and no recommended software. (This is one thing I always hated about Raspberry Pi OS - filled with bloatware that one had to manually remove later). The latest lite package was just perfect.
Chromium browser came pre-installed and YouTube videos worked fine in it. Though, I don’t think it’s not going to throw up heating issues once continuous HD playback happens. This is mostly because the in-browser process is not hardware accelerated by the GPU. Using external players is the best way to go about achieving hardware acceleration for YouTube videos. Most tutorials on the internet refer to using youtube-dl and omxplayer. YouTube-dl to extract the videofile’s link and omxplayer is the inbuilt commandline video player in Raspberry Pi OS. I tried all these. My issue was identical to the one someone posted on reddit - as shown below:
So Streamplayer worked for me.
sudo apt install git python-setuptools
git clone https://github.com/streamlink/streamlink
cd streamlink/
sudo python3 setup.py install
I was able to play videos using omxplayer but I couldn’t turn it off without killing the script using the Ctrl-C or Alt-F4. The q button didn’t work. Several attempts to make it work failed and I ended up switching to the much user friendly VLC media player.
Streamlink uses VLC as the default player. Hence a separate player need not be specified with the -p parameter. Additionally you may use appropriate network and file caching to not see any buffering.
streamlink --player "vlc --file-caching=5000 --network-caching=5000" {{</* youtube {} */>}}Once I had stream function set up, I wanted to control and select things on the Rpi using the TV’s remote. I found a recent guide to setting up HDMI-CEC on Raspberry Pi OS using the cec-utils package.
Follow the installation given in the guide linked above to setup and verify your HDMI-CEC connection.
A user on the Ubuntu-mate community had created an extensive script to control the Rpi using the TV remote. Here’s the link to the post.
Do not install the cec-client again as we already installed the whole cec-utils package earlier.
Simply install just the xdotools for controlling the mouse and sending keystrokes on the Rpi :
sudo apt-get install xdotoolFollow rest of the guide to make the executable script and also check out the updated code found in one of the replies- try and check which one works fine. You need not have the exact same remote so you’ll have the change the code based on specific remote that you have.
I also followed another reply on the post to get a virtual onscreen keyboard.
sudo apt-get install xvkbdTo make it run at boot I tried using the crontab command and using systemd both of it didn’t work properly. systemd was running the program too early in boot and waiting for graphical.target or network.target didn’t work. So in order to make it work after the desktop is loaded I did the following:
sudo nano /etc/xdg/lxsession/LXDE-pi/autostartTo the above file added the startup script as follows:
@ sudo /home/pi/start.shMake sure to specify the full path to the file and also convert the start.sh script into an executable using the following command:
sudo chmod +x /home/pi/start.shMy start.sh script contains the scripts I want to run at startup. Here’s the custom remote code that I use for the SONY remote.
#!/bin/bash

#!/bin/bash

#-------------------- use to access GPIO and set status LEDs --------------
---

#using GPIO makes it mandatory to use sudo in calls

#   Exports GPIO pin to userspace
#echo "21" > /sys/class/gpio/export

# Sets pin 21 as an output
#echo "out" > /sys/class/gpio/gpio21/direction

# Sets pin 21 to high
#echo "0" > /sys/class/gpio/gpio21/value

# Sets pin 18 to low
#echo "0" > /sys/class/gpio/gpio18/value

#   Exports GPIO pin to userspace
#echo "20" > /sys/class/gpio/export

# Sets pin 20 as an output
#echo "out" > /sys/class/gpio/gpio20/direction

# Sets pin 20 to high
#echo "1" > /sys/class/gpio/gpio20/value

# Sets pin 18 to low
#echo "0" > /sys/class/gpio/gpio18/value

#------------------main function -----------------------------
---
# Original script of Simon Murgelj - https://ubuntu-mate.community/u/GizmoXomziG
# Modified for use with SONY remote by glenzac

function keychar {
    parin1=$1 #first param; abc1
    parin2=$2 #second param; 0=a, 1=b, 2=c, 3=1, 4=a, ...
    parin2=$((parin2)) #convert to numeric
    parin1len=${#parin1} #length of parin1
    parin2pos=$((parin2 % parin1len)) #position mod
    char=${parin1:parin2pos:1} #char key to simulate
    if [ "$parin2" -gt 0 ]; then #if same key pressed multiple times, delete previous char; write a, delete a write b, delete b write c, ...
        xdotool key "BackSpace"
    fi
    #special cases for xdotool ( X Keysyms )
    if [ "$char" = " " ]; then char="space"; fi
    if [ "$char" = "." ]; then char="period"; fi
    if [ "$char" = "-" ]; then char="minus"; fi
    xdotool key $char
}
datlastkey=$(date +%s%N)
strlastkey=""
strlastid=""
intkeychar=0
intmsbetweenkeys=1000 #two presses of a key sooner that this makes it delete previous key and write the next one (a->b->c->1->a->...)
intmousestartspeed=15 #mouse starts moving at this speed (pixels per key press)
intmouseacc=15 #added to the mouse speed for each key press (while holding down key, more key presses are sent from the remote)
intmousespeed=15

while read oneline
do
    keyline=$(echo $oneline | grep " key ")
    echo $keyline --- debugAllLines
    if [ -n "$keyline" ]; then
        datnow=$(date +%s%N)
        datdiff=$((($datnow - $datlastkey) / 1000000)) #bla bla key pressed: previous channel (123)
        strkey=$(grep -oP '(?<=sed: ).*?(?= \()' <<< "$keyline") #bla bla key pres-->sed: >>previous channel<< (<--123)
        strstat=$(grep -oP '(?<=key ).*?(?=:)' <<< "$keyline") #bla bla -->key >>pressed<<:<-- previous channel (123)
        strpressed=$(echo $strstat | grep "pressed")
        strreleased=$(echo $strstat | grep "released")
        if [ -n "$strpressed" ]; then
            strid=$(grep -oP '(\[ ).*?(\])' <<< "$keyline") # get the id from the debug line to ingnore dupe detection.
            #echo $keyline --- debug
            if [ "$strkey" = "$strlastkey" ] && [ "$datdiff" -lt "$intmsbetweenkeys" ]; then
                intkeychar=$((intkeychar + 1)) #same key pressed for a different char
            else
                intkeychar=0 #different key / too far apart
            fi
            datlastkey=$datnow
            strlastkey=$strkey
            if [ "$strid" != "$strlastid" ]; then
                case "$strkey" in
                    "1")
                        xdotool key "BackSpace"
                        ;;
                    "2")
                        keychar "abc2" intkeychar
                        ;;
                    "3")
                        keychar "def3" intkeychar
                        ;;
                    "4")
                        keychar "ghi4" intkeychar
                        ;;
                    "5")
                        keychar "jkl5" intkeychar
                        ;;
                    "6")
                        keychar "mno6" intkeychar
                        ;;
                    "7")
                        keychar "pqrs7" intkeychar
                        ;;
                    "8")
                        keychar "tuv8" intkeychar
                        ;;
                    "9")
                        keychar "wxyz9" intkeychar
                        ;;
                    "0")
                        keychar " 0.-" intkeychar
                        ;;
                    "previous channel")
                        xdotool key "Return" #Enter
                        ;;
                    "electronic program guide")
                        xdotool click 4 #mouse scroll up
                        ;;
                    "setup menu")
                        xdotool click 5 #mouse scroll down
                        ;;
                    "channels list")
                        xdotool click 3 #right mouse button click
                        ;;
                    "up")
                        intpixels=$((-1 * intmousespeed))
                        xdotool mousemove_relative -- 0 $intpixels #move mouse up
                        intmousespeed=$((intmousespeed + intmouseacc)) #speed up
                        ;;
                    "down")
                        intpixels=$(( 1 * intmousespeed))
                        xdotool mousemove_relative -- 0 $intpixels #move mouse down
                        intmousespeed=$((intmousespeed + intmouseacc)) #speed up
                        ;;
                    "left")
                        intpixels=$((-1 * intmousespeed))
                        xdotool mousemove_relative -- $intpixels 0 #move mouse left
                        intmousespeed=$((intmousespeed + intmouseacc)) #speed up
                        ;;
                    "right")
                        intpixels=$(( 1 * intmousespeed))
                        xdotool mousemove_relative -- $intpixels 0 #move mouse right
                        intmousespeed=$((intmousespeed + intmouseacc)) #speed up
                        ;;
                    "select")
                        xdotool click 1 #left mouse button click
                        ;;
                    "root menu")
			killall vlc

                        ;;
                    "sub picture")
                        echo Key Pressed: SUB PICTURE
			sync;sync;shutdown -h now
                        ;;
                    "F2")
			killall vlc
                        ;;
                    "F3")
			python3 gui_test.py &
                        ;;
                    "F4")
                        #echo Key Pressed: YELLOW C
                        #sync;sync;shutdown -h now
			chromium-browser "https://www.youtube.com"
                        ;;
                    "F1")
                    	((xvkbd++))
                    	switch=0
                    	xdotool mousemove 1100 750
                    	xvkbd -no-keypad  -geometry 1920x350+0-20  &
                    	test $xvkbd -eq 2 && killall xvkbd && xvkbd=0
                    	;;
                        #chromium-browser --incognito "https://www.google.com" &
                        #;;
                    "rewind")
                        echo Key Pressed: REWIND
                        ;;
                    "pause")
                        echo Key Pressed: PAUSE
                        ;;
                    "Fast forward")
                        echo Key Pressed: FAST FORWARD
                        ;;
                    "play")
                        echo Key Pressed: PLAY
                        ;;
                    "stop")
                        ## with my remote I only got "STOP" as key released (auto-released), not as key pressed; see below
                        echo Key Pressed: STOP
                        ;;
                    *)
                        echo Unrecognized Key Pressed: $strkey ; CEC Line: $keyline
                        ;;

                esac
            else
                echo Ignoring key $strkey with duplicate id $strid
            fi
            # store the id of the keypress to check for duplicate press count.
            strlastid=$strid
        fi
        if [ -n "$strreleased" ]; then
            #echo $keyline --- debug
            case "$strkey" in
                "stop")
                    echo Key Released: STOP
                    ;;
                "up")
                    intmousespeed=$intmousestartspeed #reset mouse speed
                    ;;
                "down")
                    intmousespeed=$intmousestartspeed #reset mouse speed
                    ;;
                "left")
                    intmousespeed=$intmousestartspeed #reset mouse speed
                    ;;
                "right")
                    intmousespeed=$intmousestartspeed #reset mouse speed
                    ;;
            esac
        fi
    fi
done
Recommendations for the Rpi
- change GPU allocation in raspi-config to at least 128MB. I use 256MB for GPU.
- change default python to python3 for best compatibility with streamlink when the command is executed as a script
- use the modern subprocess module instead of os.system call to run bash scripts within python
- to wake a raspberry pi from the halt state (i.e after a shutdown with only the red light) simply connect a pushbutton in between board pins 5 and 6 on the pi. When the button is pressed the pin is shorted to ground and this triggers a boot on the Rpi
- Power cycling can also be achieved by shorting the onboard RUN pins on the RPI. Note that no connections are soldered onto the pins. If you need to use it you have to manually solder header pins to it.
- Also checkout this one button halt and restart circuit
- Set up a watchdog on Rpi to reboot it whenever it freezes or crashes this way you don’t have to keep pulling the plug every time it crashes. I used the answer here. For my use-case I set the time to 20sec.
- add cooling fan — link to the post of power supply build 🔴🔴🔴
- Added following commands to /boot/cmdline.txt to turn off network boost mode
smsc95xx.turbo_mode=N - Run Rpi diagnostics to check the speed of your SD card. I have a class 10 card but still it fared well in the speed test.
https://i.imgur.com/7AOXqSk.jpg
Fetching YouTube live links and streams
The main purpose of this build is to watch live YouTube streams, especially news channels. The problem here is that different YouTube channels keep changing their live video links from time to time. Some channels change it after a couple of months. Some change it every few days. To not painstakingly find links each time we need to play something we need to use the YouTube API to fetch live links.
- First get the channel ID
- Use YouTube API calls to fetch links to the live playback
Here is the python program to fetch links automatically and save it to a file links.txt This needs your Google YouTube API key in the api-key.txt file in the same location. Also find the channel IDs manually as a one time process and add it to the list. Then this python code automatically fetches links to live streams.
import requests

# List of CHannel ID (asianetnews,manorama,news24,mathrubhumi,kairali,mediaone,NDTV News,CNN Live,Parumala,Reporter,news18,jeevan,janam)
CHANNEL_ID = ["UCf8w5m0YsRa8MHQ5bwSGmbw","UCP0uG-mcMImgKnJz-VjJZmQ","UCup3etEdjyF1L3sRbU-rKLw","UCwXrBBZnIh2ER4lal6WbAHw","UCkCWitaToNG1_lR-Si1oMrg","UC-f7r46JhYv78q5pGrO6ivA","UCZFMm1mMw0F81Z37aaEzTUA","UCef1-8eOpJgud7szVPlZQAQ","UC8ebJ_anG4byfhC_2hT7eKw","UCFx1nseXKTc1Culiu3neeSQ","UC-mMi78WJST4N5o8_i1FoXw","UCjX2Z1XGWEbKEGgKMACbhkw","UCNVkxRPqsBNejO6B9thG9Xw"]

# Fetching the API Key
file = open("api-key.txt", "r")
YOUR_API_KEY = file.readline()
file.close()

#Defined empty Links array
Links=[];

# For each Channel Id, updating the channel Links
for channel in CHANNEL_ID:
	URL = "https://www.googleapis.com/youtube/v3/search?part=snippet&channelId={}&eventType=live&type=video&key={}".format(channel,YOUR_API_KEY);
	req = requests.get(url = URL);
	data = req.json()
	try:
		link = data['items'][0]['snippet']['thumbnails']['default']['url'].split("/")[4];
		print(link)
	except:
		print("Link Not Found")
		link="404"
	finally:
		Links.append(link)

#Links File opened to write
file2 = open(r"links.txt","w+")
for link in Links:
	file2.write(link+"\n")
file2.close()
Creating a custom GUI for the raspberry pi
I looked at all the options available for creating a GUI in python on a Rpi. Here are the best ones I found
- Tkinter (standard GUI application for Python)
- guizero(simple GUI library based on Tkinter)
- kivy
- remi
- GTK+
- PyQT
I chose guizero as it appeared to be very simple to implement and had good beginner friendly documentation.
The GUI looks as shown here:
Ignore the channel names, they are just YouTube live channels in my local language.
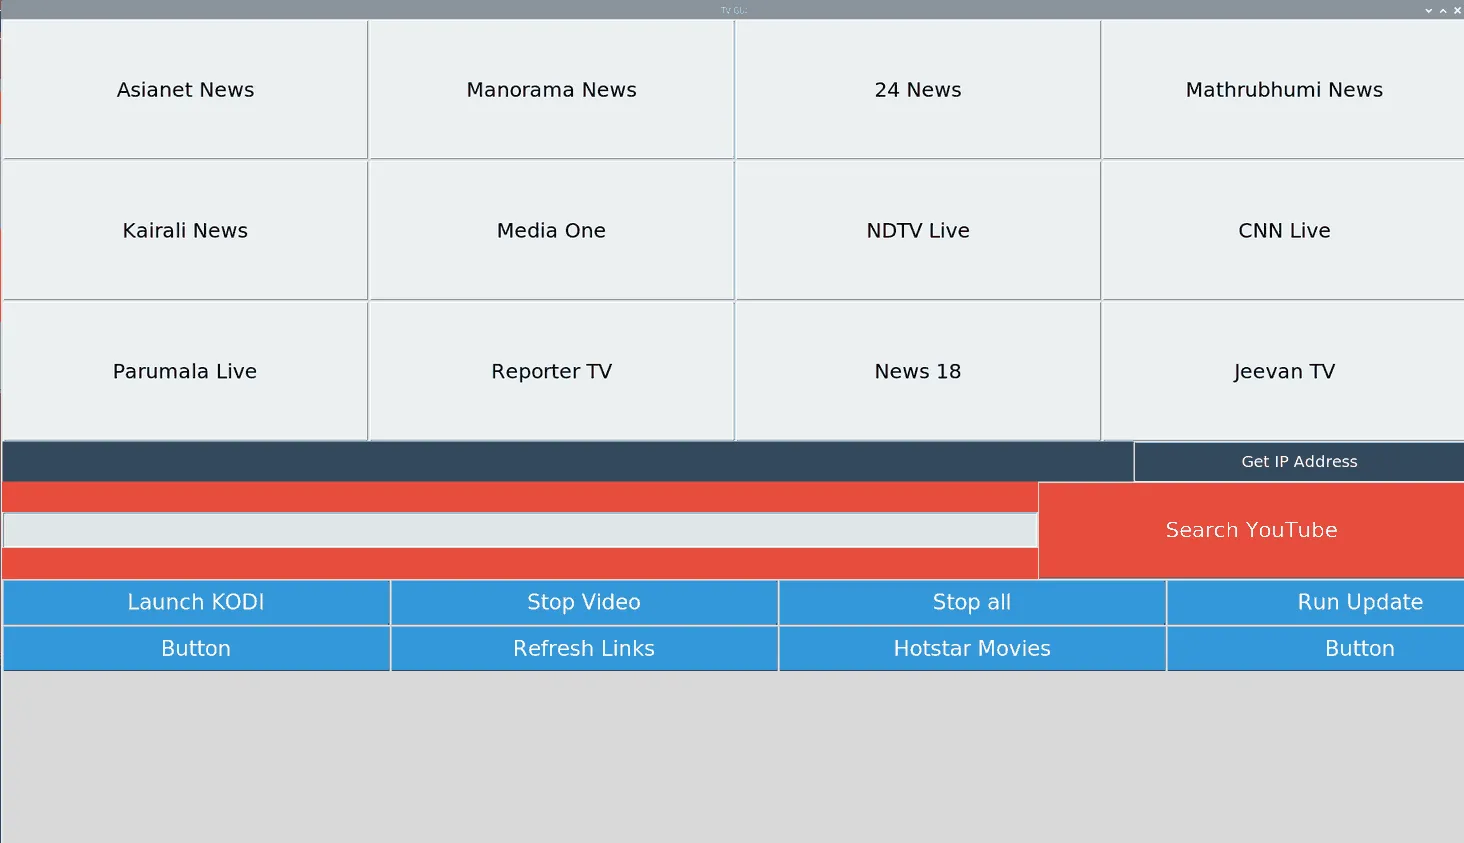
The blank grey portion at the bottom displays the terminal output when buttons are pressed. Only the current line of the terminal output appears in the space.
The python code for the custom GUI is as follows:
#!/usr/bin/python
from tkinter import *
#import time  #required for sleep
import socket #required for getting IP Address
import os  #required to get IP Address
import subprocess  #required to run shell commands
import webbrowser #required to open Chromium

from guizero import App, Text, TextBox, PushButton, Box

####################### To display the output of shell commands as a window #####################
####################### Credits : https://stackoverflow.com/a/32682520      #####################

"""
- read output from a subprocess in a background thread
- show the output in the GUI
"""
import sys
from itertools import islice
from subprocess import Popen, PIPE
from textwrap import dedent
from threading import Thread

try:
    import Tkinter as tk
    from Queue import Queue, Empty
except ImportError:
    import tkinter as tk # Python 3
    from queue import Queue, Empty # Python 3

def iter_except(function, exception):
    """Works like builtin 2-argument `iter()`, but stops on `exception`."""
    try:
        while True:
            yield function()
    except exception:
        return

class DisplaySubprocessOutputDemo:
    def __init__(self, root, query):
        self.root = root

        # start dummy subprocess to generate some output
        self.process = Popen([sys.executable, "-u", "-c", dedent("""
            import subprocess
            subprocess.call('"""+query+"""', shell=True)
            """)], stdout=PIPE)

        # launch thread to read the subprocess output
        #   (put the subprocess output into the queue in a background thread,
        #    get output from the queue in the GUI thread.
        #    Output chain: process.readline -> queue -> label)
        q = Queue(maxsize=1024)  # limit output buffering (may stall subprocess)
        t = Thread(target=self.reader_thread, args=[q])
        t.daemon = True # close pipe if GUI process exits
        t.start()

        # show subprocess' stdout in GUI
        self.label = tk.Label(root, text="  ", font=(None, 20))
        self.label.pack(ipadx=4, padx=4, ipady=4, pady=4, fill='both')
        self.update(q) # start update loop

    def reader_thread(self, q):
        """Read subprocess output and put it into the queue."""
        try:
            with self.process.stdout as pipe:
                for line in iter(pipe.readline, b''):
                    q.put(line)
        finally:
            q.put(None)

    def update(self, q):
        """Update GUI with items from the queue."""
        for line in iter_except(q.get_nowait, Empty): # display all content
            if line is None:
                self.quit()
                return
            else:
                self.label['text'] = line # update GUI
                break # display no more than one line per 40 milliseconds
        self.root.after(40, self.update, q) # schedule next update

    def quit(self):
        self.process.kill() # exit subprocess if GUI is closed (zombie!)
        self.root.destroy()

################################### Main Code #########################################################

Links=[];

def loadLinks(): # used to load the live video IDs from the links.txt file to an array
    with open("/home/pi/GUI/links.txt") as file:
        lines = file.readlines()
        last = lines[-1]
        Links.clear()
        for line in lines[:-1]:
            Links.append(line[:-1])
        Links.append(last[:-1])
loadLinks();

def highlight1(event_data): #change channel button colour when_clicked
    event_data.widget.bg = "#bdc3c7"

def lowlight1(event_data): #change channel button colour when_mouse_leaves
    event_data.widget.bg = "#ecf0f1"

def highlight2(event_data): #change button colour when_clicked
    event_data.widget.bg = "#27ae60"

def lowlight2(event_data): #change channel button colour when_mouse_leaves
    event_data.widget.bg = "#3498db"

def search_yt_query(): # Run YouTube search based on a query
    url = "https://www.youtube.com/results?search_query={}".format(search_query_box.value)
    webbrowser.open(url)
    search_query_box.clear()

### -------------------------------- channel defintions -------------------------------------------###

def load_channel_asianet(): # function that opens required channel live links
    root = tk.Tk()
    root.geometry('1920x80+0+850')
    root.title('Running Process')
    app = DisplaySubprocessOutputDemo(root,'streamlink {{</* youtube {} */>}} 240p &'.format(Links[0]))
    root.protocol("WM_DELETE_WINDOW", app.quit)

def load_channel_manorama(): # function that opens required channel live links
    root = tk.Tk()
    root.geometry('1920x80+0+850')
    root.title('Running Process')
    app = DisplaySubprocessOutputDemo(root,'streamlink {{</* youtube {} */>}} 240p &'.format(Links[1]))
    root.protocol("WM_DELETE_WINDOW", app.quit)

def load_channel_24news(): # function that opens required channel live links
    root = tk.Tk()
    root.geometry('1920x80+0+850')
    root.title('Running Process')
    app = DisplaySubprocessOutputDemo(root,'streamlink {{</* youtube {} */>}} 240p &'.format(Links[2]))
    root.protocol("WM_DELETE_WINDOW", app.quit)

def load_channel_mathrubhumi(): # function that opens required channel live links
    root = tk.Tk()
    root.geometry('1920x80+0+850')
    root.title('Running Process')
    app = DisplaySubprocessOutputDemo(root,'streamlink {{</* youtube {} */>}} 240p &'.format(Links[3]))
    root.protocol("WM_DELETE_WINDOW", app.quit)

def load_channel_kairali(): # function that opens required channel live links
    root = tk.Tk()
    root.geometry('1920x80+0+850')
    root.title('Running Process')
    app = DisplaySubprocessOutputDemo(root,'streamlink {{</* youtube {} */>}} 240p &'.format(Links[4]))
    root.protocol("WM_DELETE_WINDOW", app.quit)

def load_channel_mediaone(): # function that opens required channel live links
    root = tk.Tk()
    root.geometry('1920x80+0+850')
    root.title('Running Process')
    app = DisplaySubprocessOutputDemo(root,'streamlink {{</* youtube {} */>}} 240p &'.format(Links[5]))
    root.protocol("WM_DELETE_WINDOW", app.quit)

def load_channel_ndtv(): # function that opens required channel live links
    root = tk.Tk()
    root.geometry('1920x80+0+850')
    root.title('Running Process')
    app = DisplaySubprocessOutputDemo(root,'streamlink {{</* youtube {} */>}} 240p &'.format(Links[6]))
    root.protocol("WM_DELETE_WINDOW", app.quit)

def load_channel_cnn(): # function that opens required channel live links
    root = tk.Tk()
    root.geometry('1920x80+0+850')
    root.title('Running Process')
    app = DisplaySubprocessOutputDemo(root,'streamlink {{</* youtube {} */>}} 240p &'.format(Links[7]))
    root.protocol("WM_DELETE_WINDOW", app.quit)

def load_channel_parumala(): # function that opens required channel live links
    root = tk.Tk()
    root.geometry('1920x80+0+850')
    root.title('Running Process')
    app = DisplaySubprocessOutputDemo(root,'streamlink {{</* youtube {} */>}} 240p &'.format(Links[8]))
    root.protocol("WM_DELETE_WINDOW", app.quit)

def load_channel_reporter(): # function that opens required channel live links
    root = tk.Tk()
    root.geometry('1920x80+0+850')
    root.title('Running Process')
    app = DisplaySubprocessOutputDemo(root,'streamlink {{</* youtube {} */>}} 240p &'.format(Links[9]))
    root.protocol("WM_DELETE_WINDOW", app.quit)

def load_channel_news18(): # function that opens required channel live links
    root = tk.Tk()
    root.geometry('1920x80+0+850')
    root.title('Running Process')
    app = DisplaySubprocessOutputDemo(root,'streamlink {{</* youtube {} */>}} 240p &'.format(Links[10]))
    root.protocol("WM_DELETE_WINDOW", app.quit)

def load_channel_jeevan(): # function that opens required channel live links
    root = tk.Tk()
    root.geometry('1920x80+0+850')
    root.title('Running Process')
    app = DisplaySubprocessOutputDemo(root,'streamlink {{</* youtube {} */>}} 240p &'.format(Links[11]))
    root.protocol("WM_DELETE_WINDOW", app.quit)

def load_channel_janam(): # function that opens required channel live links
    root = tk.Tk()
    root.geometry('1920x80+0+850')
    root.title('Running Process')
    app = DisplaySubprocessOutputDemo(root,'streamlink {{</* youtube {} */>}} 240p &'.format(Links[12]))
    root.protocol("WM_DELETE_WINDOW", app.quit)

### -------------------------------------------------------------------------------------------------------###

def get_ip(): # Fetches the local IP Address of the Rpi
    gw = os.popen("ip -4 route show default").read().split()
    s = socket.socket(socket.AF_INET, socket.SOCK_DGRAM)
    s.connect((gw[2], 0))
    ipaddr = s.getsockname()[0]
    ipdisplay.value = ipaddr

def launch_kodi(): # Launch KODI
    subprocess.call('kodi', shell=True)

def stop_video(): # Stop all video playback in vlc
    subprocess.call('sudo killall vlc', shell=True)

def stop_all(): # Kill the browser
    subprocess.call('sudo pkill chromium-browse', shell=True)

def update_firmware(): #  Runs a script that updates the Rpi
    root = tk.Tk()
    root.geometry('1920x80+0+850')
    root.title('Running Process')
    app = DisplaySubprocessOutputDemo(root,'sudo /home/pi/GUI/auto-update.sh')
    root.protocol("WM_DELETE_WINDOW", app.quit)

def refresh_links(): # Runs a script that fetches links to live YouTube video
    root = tk.Tk()
    root.geometry('1920x80+0+850')
    root.title('Running Process')
    app = DisplaySubprocessOutputDemo(root,'sudo python3 /home/pi/GUI/update_channel.py')
    loadLinks()
    root.protocol("WM_DELETE_WINDOW", app.quit)

def launch_hotstar(): # run www.hotsar.com popular movies on Chromium
    subprocess.call('chromium-browser https://www.hotstar.com/in/movies/languages/malayalam', shell=True)

### -------------------------------------  Main GUI interface ---------------------------------------- ###

app = App(title="TV GUI",width=1920, height=1050) # not full HD dimensions to give space to the taskbar

# Contains the buttons for the different channels
channel_box = Box(app, width="fill",layout="grid", align="top", border=False)
channel_box.bg="#ecf0f1"
# Defining the channel buttons
button1 = PushButton(channel_box, command=load_channel_asianet, text="Asianet News", grid=[0,0],width=27, height=5)
button1.text_size=19
button1.when_clicked = highlight1
button1.when_mouse_leaves = lowlight1
button2 = PushButton(channel_box, command=load_channel_manorama, text="Manorama News",grid=[1,0],width=27, height=5)
button2.text_size=19
button2.when_clicked = highlight1
button2.when_mouse_leaves = lowlight1
button3 = PushButton(channel_box, command=load_channel_24news, text="24 News",grid=[2,0],width=27, height=5)
button3.text_size=19
button3.when_clicked = highlight1
button3.when_mouse_leaves = lowlight1
button4 = PushButton(channel_box, command=load_channel_mathrubhumi, text="Mathrubhumi News",grid=[3,0],width=27, height=5)
button4.text_size=19
button4.when_clicked = highlight1
button4.when_mouse_leaves = lowlight1
button5 = PushButton(channel_box, command=load_channel_kairali, text="Kairali News",grid=[0,1],width=27, height=5)
button5.text_size=19
button5.when_clicked = highlight1
button5.when_mouse_leaves = lowlight1
button6 = PushButton(channel_box, command=load_channel_mediaone, text="Media One",grid=[1,1],width=27, height=5)
button6.text_size=19
button6.when_clicked = highlight1
button6.when_mouse_leaves = lowlight1
button7 = PushButton(channel_box, command=load_channel_ndtv, text="NDTV Live",grid=[2,1],width=27, height=5)
button7.text_size=19
button7.when_clicked = highlight1
button7.when_mouse_leaves = lowlight1
button8 = PushButton(channel_box, command=load_channel_cnn, text="CNN Live",grid=[3,1],width=27, height=5)
button8.text_size=19
button8.when_clicked = highlight1
button8.when_mouse_leaves = lowlight1
button9 = PushButton(channel_box, command=load_channel_parumala, text="Parumala Live",grid=[0,2],width=27, height=5)
button9.text_size=19
button9.when_clicked = highlight1
button9.when_mouse_leaves = lowlight1
button10 = PushButton(channel_box, command=load_channel_reporter, text="Reporter TV",grid=[1,2],width=27, height=5)
button10.text_size=19
button10.when_clicked = highlight1
button10.when_mouse_leaves = lowlight1
button11 = PushButton(channel_box, command=load_channel_news18, text="News 18",grid=[2,2],width=27, height=5)
button11.text_size=19
button11.when_clicked = highlight1
button11.when_mouse_leaves = lowlight1
button12 = PushButton(channel_box, command=load_channel_jeevan, text="Jeevan TV",grid=[3,2],width=27, height=5)
button12.text_size=19
button12.when_clicked = highlight1
button12.when_mouse_leaves = lowlight1

# Contains the button and Text area for printing IP address
ip_box = Box(app, width="fill", align="top", border=False)
ip_box.bg = "#34495e"
ip_box.text_color="white"
ip_button = PushButton(ip_box, command=get_ip, text="Get IP Address",width=30, align="right")
ip_button.text_size=15
ipdisplay = Text(ip_box, text="  ",size=20,font="Lato",color="white")

# Contains the button and TextBox for YouTube search based on entered query
youtube_box = Box(app, width="fill", align="top", border=False)
youtube_box.bg="#e74c3c"
search_query_box = TextBox(youtube_box, width ="fill",align="left",multiline=False)
search_query_box.text_size = 25
search_query_box.bg = "#dfe6e9"
search_button = PushButton(youtube_box, command=search_yt_query, text="Search YouTube", align="right",width=30, height=3)
search_button.text_size = 20
search_button.text_color="white"

# Contains the buttons for executing system functions
buttons_box = Box(app, width="fill",layout="grid", align="top", border=False)
buttons_box.bg="#3498db"
buttons_box.text_color="white"
button13 = PushButton(buttons_box, command=launch_kodi, text="Launch KODI", grid=[0,0],width=27, height=1)
button13.text_size=20
button13.when_clicked = highlight2
button13.when_mouse_leaves = lowlight2
button14 = PushButton(buttons_box, command=stop_video, text="Stop Video",grid=[1,0],width=27, height=1)
button14.text_size=20
button14.when_clicked = highlight2
button14.when_mouse_leaves = lowlight2
button15 = PushButton(buttons_box, command=stop_all, text="Stop all",grid=[2,0],width=27, height=1)
button15.text_size=20
button15.when_clicked = highlight2
button15.when_mouse_leaves = lowlight2
button16 = PushButton(buttons_box, command=update_firmware, text="Run Update",grid=[3,0],width=27, height=1)
button16.text_size=20
button16.when_clicked = highlight2
button16.when_mouse_leaves = lowlight2
button17 = PushButton(buttons_box, command=stop_all, text="Button",grid=[0,1],width=27, height=1)
button17.text_size=20
button17.when_clicked = highlight2
button17.when_mouse_leaves = lowlight2
button18 = PushButton(buttons_box, command=refresh_links, text="Refresh Links",grid=[1,1],width=27, height=1)
button18.text_size=20
button18.when_clicked = highlight2
button18.when_mouse_leaves = lowlight2
button19 = PushButton(buttons_box, command=launch_hotstar, text="Hotstar Movies",grid=[2,1],width=27, height=1)
button19.text_size=20
button19.when_clicked = highlight2
button19.when_mouse_leaves = lowlight2
button20 = PushButton(buttons_box, command=stop_all, text="Button",grid=[3,1],width=27, height=1)
button20.text_size=20
button20.when_clicked = highlight2
button20.when_mouse_leaves = lowlight2

#extra buttons left for future upgrades
#button = PushButton(buttons_box, command=load_channel_reporter, text="Button",grid=[0,2],width=27, height=1)
#button.text_size=19
#button = PushButton(buttons_box, command=load_channel_news18, text="Button",grid=[1,2],width=27, height=1)
#button.text_size=19
#button = PushButton(buttons_box, command=load_channel_jeevan, text="Button",grid=[2,2],width=27, height=1)
#button.text_size=19
#button = PushButton(buttons_box, command=load_channel_ndtv, text="Button",grid=[3,2],width=27, height=1)
#button.text_size=19

app.display()
Adding Kodi on Raspberry Pi OS
Add kodi to Raspberry Pi OS by running the following:
sudo apt-get update
sudo apt-get install kodi
To run simply execute kodi on the terminal. I’ll be using kodi to list all the movies and music in the attached drives and to play them easily. If the HTTP server is turned on you can control playback on Kodi using the Kore App for KODI. Kodi was what I used for watching movies and to play music. I loved the ARIA skin.
Adding a local Blynk server
I also made the pi run a local Blynk server to control the speed of the cooling fan and also in hopes of using for home automation. I followed the instructions given on the blynk.cc website to run a Blynk server. A NodeMCU connects to this server and runs the cooling fan of the pi when a connection is established.
To be done:
- send IR commands using ESP8266 or Rpi
- using lircd or IR functions directly from the ESP8266
Note:
I do not find the Raspberry Pi to be 100% reliable. It’s hard to make such systems perfect. To make it totally foolproof one has to mount the drive as read-only and re-write all the code in such a way that all the temporary data is fetched at startup and stored into the RAM. Doing this will ensure that you don’t corrupt your boot files when somebody simply pulls the cord off the pi without shutting it down.
After about 1.5 months of good use, it so happened that the pi boot partition got corrupt after a dirty shutdown. By then I didn’t have much time to spend on configuring this all over again. I just bought a new streaming device. But overall it has been a great learning experience. I got to push the pi to its limits.
Comments